iOS SDK Integration 0.0.1
Introduction
Lens is a camera framework which captures C2PA-compliant verified photos and videos. After successful capture, photos contain assertions (such as location, date and time, used to verify the provenance of the image), and are cryptographically signed.
The camera itself has no user interface elements, allowing you to customize the look and feel to match your app’s existing style. The SDK provides API for interacting with the camera’s controls; initiating capture, turning flash on and off, etc.
Requirements
To build a project using Lens SDK the minimum requirements are:
- iOS Deployment Target 14.0+
- Xcode 13.0+
- Swift 5.0+
- LensSDK framework library
Getting Started
Validate the SHA256 release checksum
The SHA256 checksum value of the release library can be found in checksum.txt.
The following command can be run in the same directory as the checksum.txt
file:
shasum -c checksum.txtThe expected output should display: MarioPlatformSDK.zip: OK
Xcode
Import the Framework library
Once you have verified the checksum of the library, you can drag the
LensSDK.xcframework folder into your Xcode project directory under
Frameworks. For example:
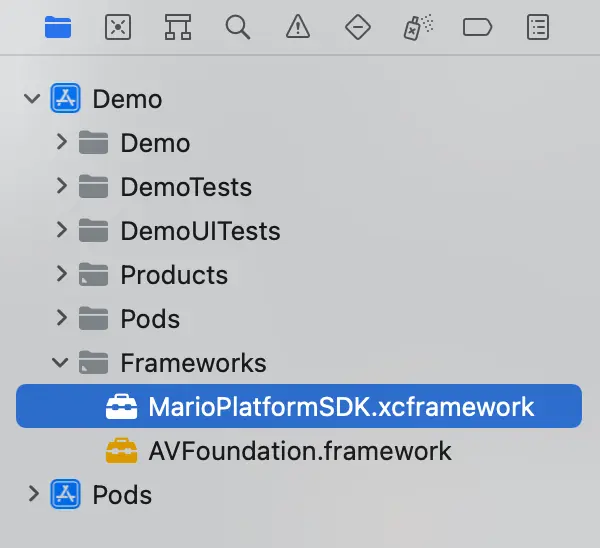
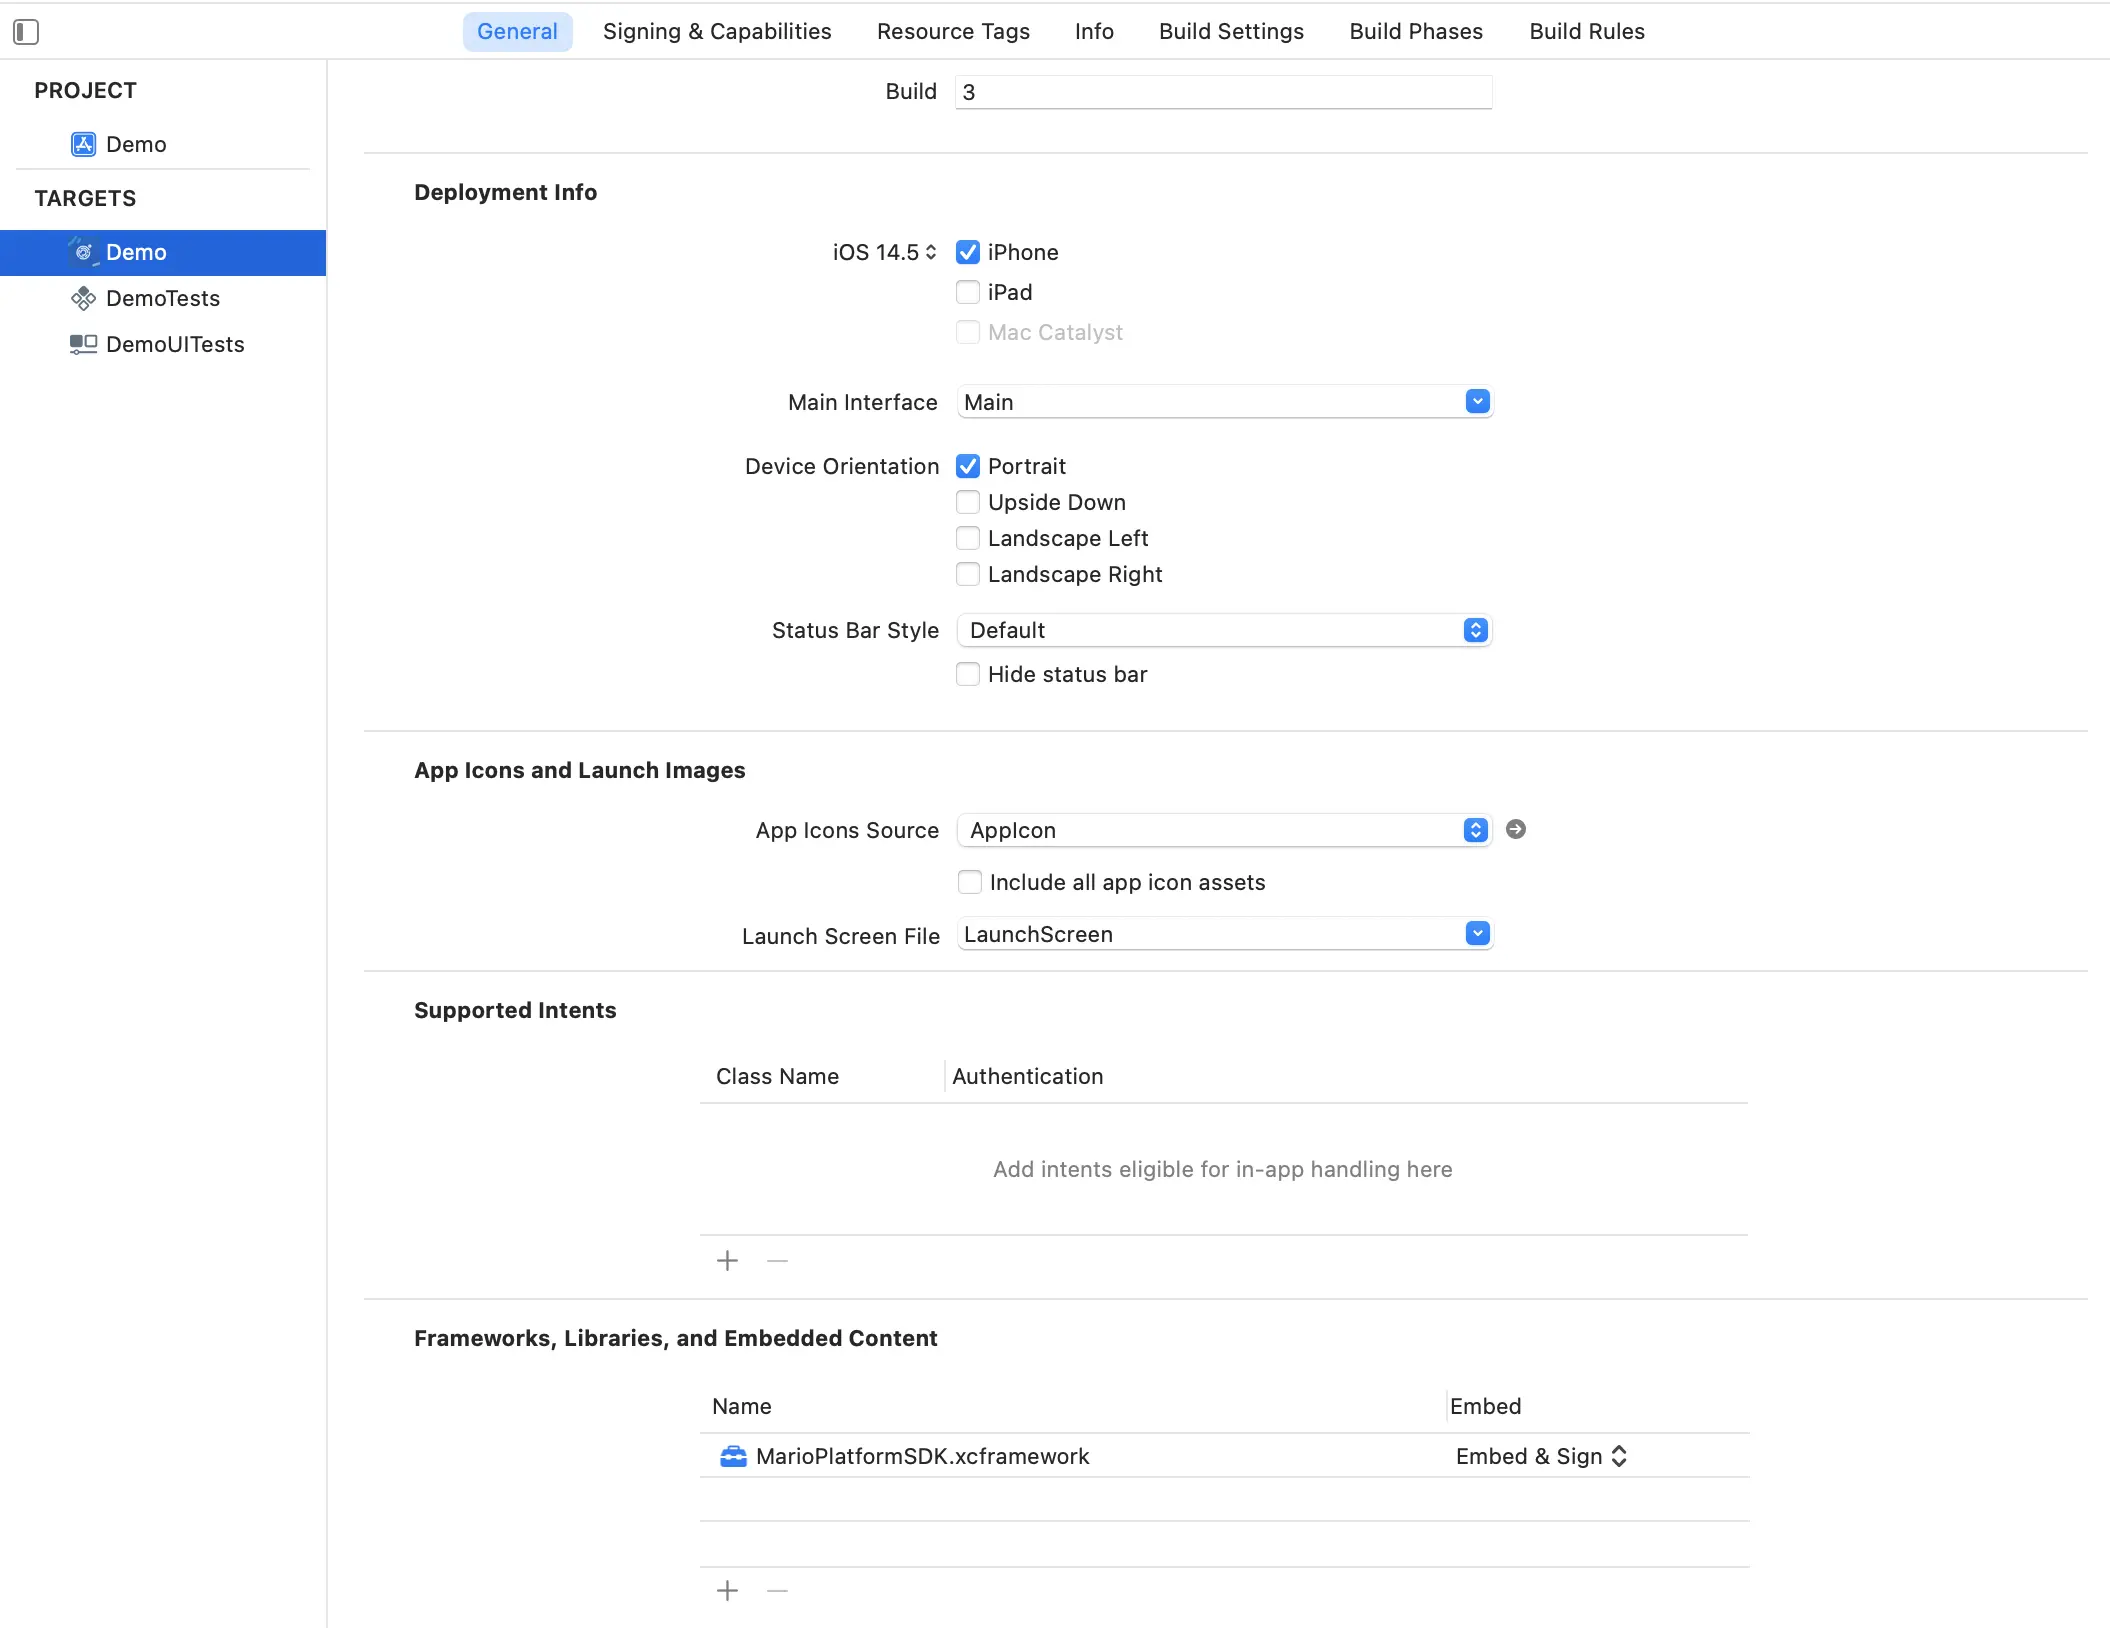
- When building to a Device, ensure that the
Targets > General > Frameworks, Libraries, and Embedded Contentsetting is set toEmbed > Embed & Sign
Set Enable Bitcode to No
- This can be set in
Targets > Build Settings > Build Options > Enable Bitcode > No
Application
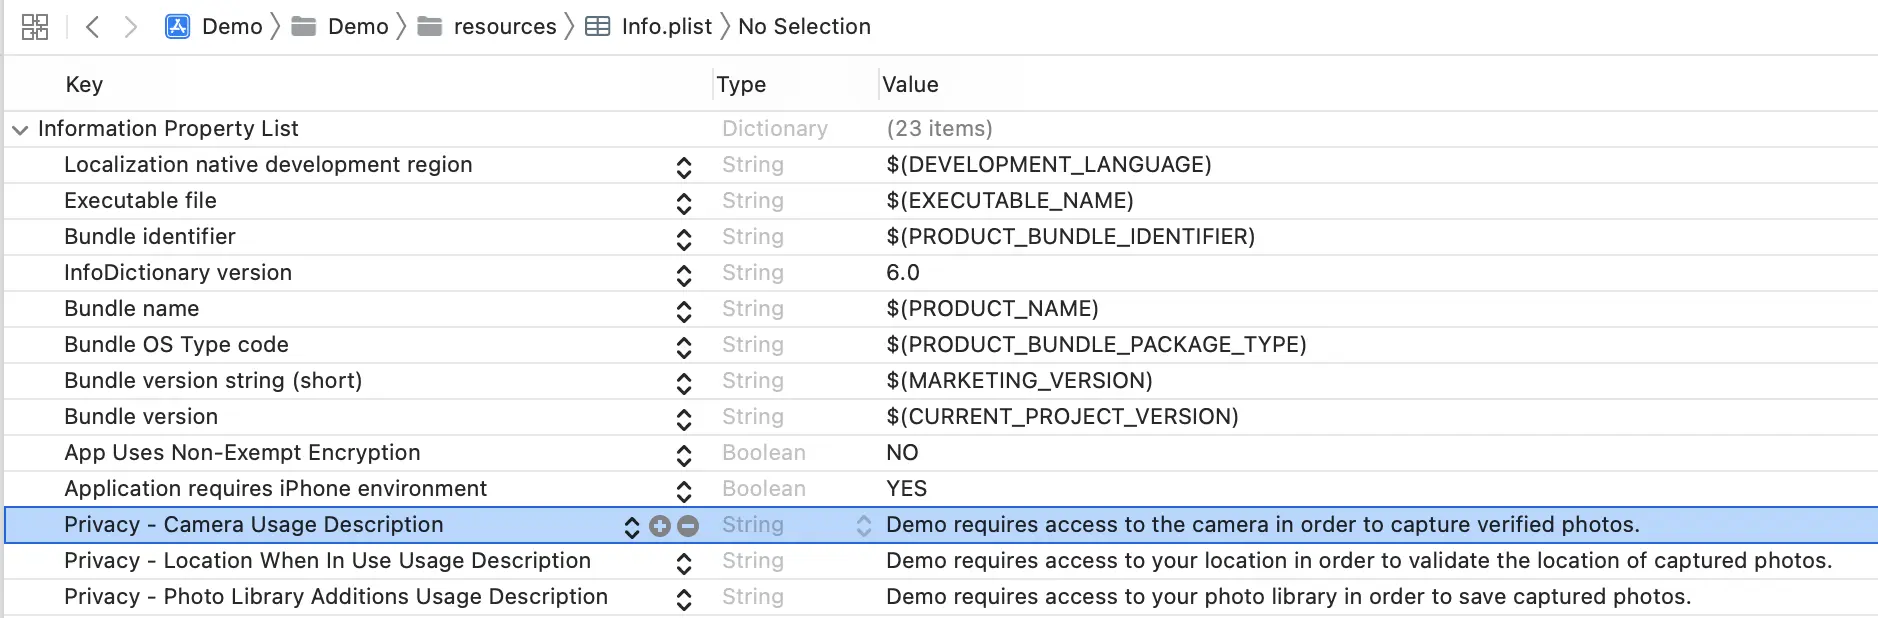
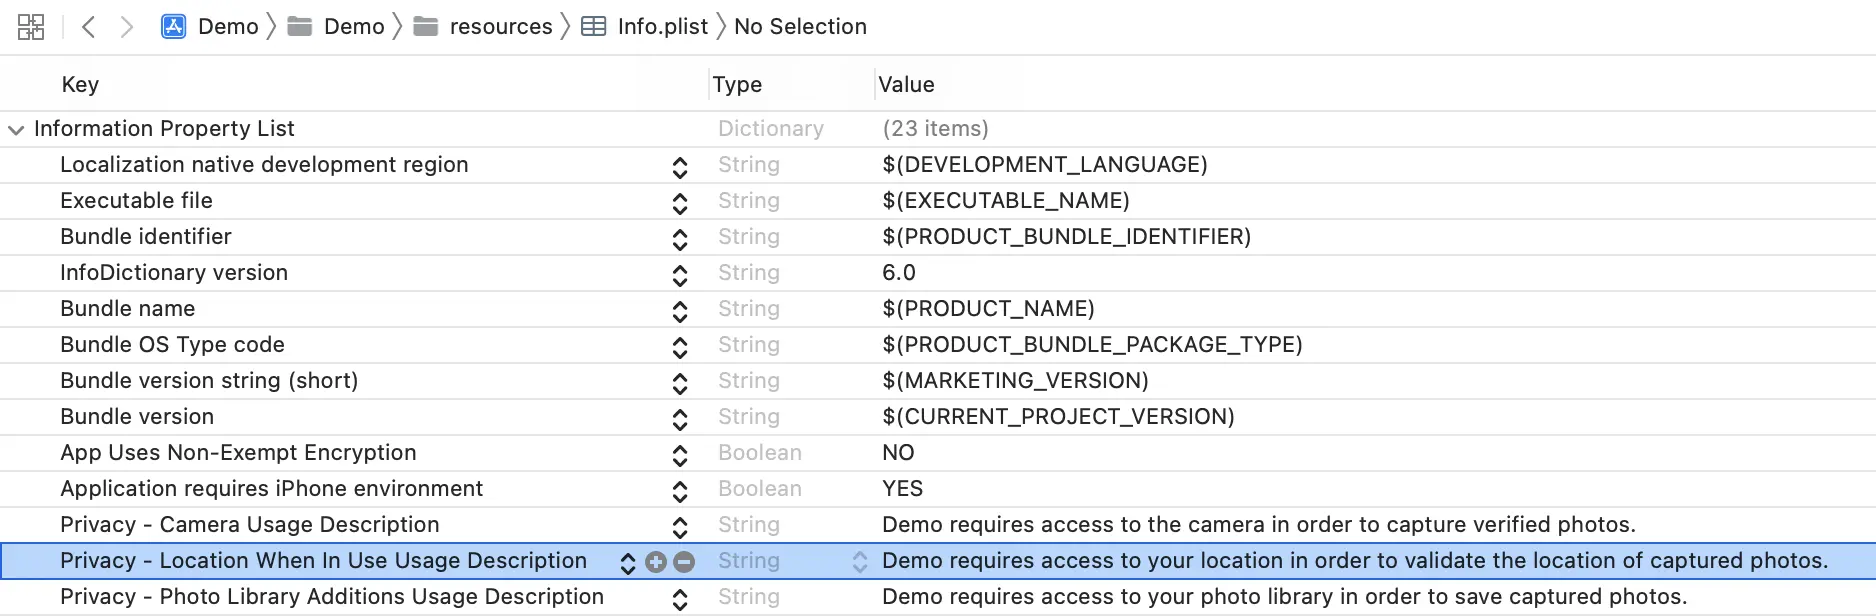
Permissions
Lens SDK needs two user permissions to function; one for the camera, and one for
location when in use. To facilitate this, two property list keys must be added
to your app’s Info.plist by either:
- adding the relevant
Privacykey from the Information Property List dropdown in Xcode, or - manually editing the XML by right clicking on
Info.plistand selectingOpen As > Source Code.
Lens SDK validates it has the necessary permissions and will issue an error to your application if the permissions have not been obtained.
Camera
Add the following to your app’s Info.plist:
Key: Privacy - Camera Usage Description
Value (example):
APPNAME requires access to the camera in order to capture verified photos.
or
<key>NSCameraUsageDescription</key>
<string>APPNAME requires access to the camera in order to capture verified photos.</string>
Location When In Use
Add the following to your app’s Info.plist:
Key: Privacy - Location When In Use Usage Description
Value (example):
APPNAME uses Location Services to validate the accuracy of your image's location.
or
<key>NSLocationWhenInUseUsageDescription</key>
<string>APPNAME requires access to your location in order to validate the location of captured photos.</string>
Implementation
In this first iteration, it is left to you as the developer of the app hosting
LensSDK to provide all user interface affordances which will interact with the
camera; capture button, flash on/off button, front/rear camera swap button, etc.
As part of the initialization procedure, you pass a reference to a UIView
which will host the Lens Camera preview view.
The features supported by the camera are:
- photo and video capture
- switch between front and back default cameras
- flash off/on/auto
- tap to focus
- pinch to zoom
Camera Preview & Delegate Setup
- Start by importing the SDK in your view controller:
import LensSDK- Implement the required
LensCameraDelegatemethods:
extension ViewController: LensCameraDelegate {
    func lensCameraDidFailWithError(_ error: LensCameraError) {
        // Called when an error is encountered during camera setup or configuration.
    }

    func lensCameraDidFinishInitialCapture(_ imageName: String, _ image: UIImage) {
        // Called when the preview thumbnail has been generated.
        // The thumbnail has no C2PA claims or assertions, and is not cryptographically signed.
    }

    func lensCameraDidGenerateTruepic(_ imageName: String, _ truepic: Data) {
        // Called then when the final signed image has been generated.
        // The image data returned by this callback will have C2PA provenance.
    }

    func lensCameraDidDisableCapture(for reasons: Set<LensCaptureStatus>) {
        // Called when a device state is encountered which requires that the
        // camera capture be disabled. This can be for a number of reasons, for example,
        // for no internet connectivity, during the enrollment process, etc.
        // You should update the state of your camera controls to reflect this.
    }

    func lensCameraDidEnableCapture() {
        // Called when a previously encountered device state which disabled capture
        // has been resolved. You should update the state of your camera controls
        // to reflect this.
    }
}- If you choose to implement video recording, tap-to-focus, pinch-to-zoom,
etc., implement the optional
LensCameraDelegatemethods:
extension ViewController: LensCameraDelegate {

    func lensCameraDidStartRecordingVideo() {
        // Called when Lens starts recording video frames to disk.
        // Use this to start a timer to show the user how long they've been recording.
    }

    func lensCameraDidStopRecordingVideo() {
        // Called when Lens stops recording video frames to disk.
    }

    func lensCameraDidGenerateVideoThumnail(fileName: String, image: UIImage, duration: TimeInterval?) {
        // Called when Lens generates a thumbnail for the video file.
        // - Parameter fileName: the name of the image file, which matches the video output file name.
        // - Parameter image: a UIImage containing the thumbnail.
        // - Parameter duration: the duration of the recorded video.
    }

    func lensCameraDidGenerateTruepicVideo(_ url: URL) {
        // Called when the recorded video data has completed C2PA processing.
        // - Parameter url: the URL to which the recorded and signed video data was saved.
    }

    func lensCameraDidGenerateUnsignedVideo(_ url: URL) {
        // Called if signing of the recorded video fails C2PAProcessing.
        // - Parameter url: the URL to which the unsigned recorded video data was saved.
    }

    func lensCameraChangedZoomFactor(_ zoomFactor: CGFloat?, error: Error?) {
        // This method provides the new zoom factor, which can be used as an informational display
        // for the user - 1X, 2X, 3X, etc.
        // - Parameter zoomFactor: the new zoom factor
    }

    func lensCameraDidFocusOnPoint(_ point: CGPoint?, error: Error?) {
        // This method confirms the actual point within the camera's viewport that was
        // used as the new focal point. Auto exposure metering is also applied to the new point.
    }

    func lensCameraDidChangeTo(_ device: LensCaptureDevice?, error: Error?) {
        // This method provides a new instance of LensCaptureDevice upon successful change.
        // This will be the same as `LensCamera.CurrentDevice`, so there is no need to cache this value.
    }

    func lensCameraDidSetFlashMode(_ mode: LensCaptureDevice.FlashMode?, error: Error?) {
        // This method provides the new flash mode that was selected.
    }

    func lensCameraSubjectAreaDidChange() {
        // If focus has been set manually, this method is called when subject area changes are detected,
        // such as lighting changes, substantial movement, etc.
    }
}- Initialize the Lens SDK and configure the camera session:
override func viewDidLoad() {
    // Instantiate camera
    guard let camera = LensCamera.sharedInstance else {
        print("Unable to instantiate Lens Camera.")
        return
    }

    // Pass a UIView object to the to SDK to display a camera preview view.
    camera.configureSession(previewView: self.cameraPreviewView, delegate: self)
}
The delegate can be any object that conforms to LensCameraDelegate.
Camera Capture Setup
Camera Mode
The default capture mode of Lens is photo. This can be changed by setting the following property:
final public var cameraMode: LensSDK.LensCameraModewhere LensCameraMode is the enum:
public enum LensCameraMode {
    case photo
    case video
}
Photo Capture
Capturing photos with Lens camera is triggered by calling the beginCapture()
method, typically within an IBAction:
@IBAction func photoCaptureTapped(button: UIButton) {
    guard let camera = LensCamera.sharedInstance else {
        print("Unable to find Lens Camera instance.")
        return
    }
    camera.beginCapture()
}
After the photo has been taken, but prior to C2PA processing and signing, Lens
will return a UIImage containing a thumbnail of the photo in the following
delegate method:
func lensCameraDidFinishInitialCapture(_ imageName: String, _ image: UIImage)where imageName is a UUID string.
Once the capture has been signed, the following delegate method will be called:
func lensCameraDidGenerateTruepic(_ imageName: String, _ truepic: Data)The final signed image is returned as a Data object to preserve C2PA
assertions and metadata.
The UIImageWriteToSavedPhotosAlbum(_:_:_:_:) method is not recommended for use
with photos captured with Lens Camera, because the UIImage class does not
support the metadata and features generated during image signing.
Video Capture
To record a video, call the startVideoCapture method. To stop an in-progress
recording, call stopVideoCapture.
@IBAction func videoCaptureTapped(button: UIButton) {
    guard let lens = LensCamera.sharedInstance else {
        print("Unable to find Lens Camera instance.")
        return
    }
    if lens.isRecordingVideo {
        lens.stopVieoCapture()
    } else {
        lens.startVideoCapture()
    }
}
When recording and C2PA-signing completes, the following delegate method will be called:
func lensCameraDidGenerateTruepicVideo(_ url: URL)where url is the location on disk to which the signed video is written.
If recording completes, but processing and signing fails, the following delegate method will be called:
func lensCameraDidGenerateUnsignedVideo(_ url: URL)where the file found at url will be an unsigned video.
While there are no restrictions on file size or duration to record verified videos and upload them to your server, there is currently a file size limit of 100 MB per video file uploaded to the Lens API for processing. This may not be necessary for your use case, but if so, we recommend limiting recording to under 45 seconds per video.
Camera Controls
The capabilities of the default capture device are encapsulated by the following:
public struct LensCaptureDevice {
    // The value of this property is a BOOL indicating whether the receiver has a flash.
    // The receiver's flashMode property can only be set when this property returns true.
    public var hasFlash: Bool { get }

    // Indicates whether the receiver's flash is currently available for use.
    // The flash may become unavailable if, for example, the device overheats and needs to cool off.
    public var isFlashAvailable: Bool { get }

    // The value of this property is a Position indicating where the receiver's device
    // is physically located on the system hardware.
    public var position: LensCaptureDevice.Position { get }

    // Indicates the mode of the flash on the receiver's device, if it has one.
    public var flashMode: LensCaptureDevice.FlashMode { get }

    // The value of this property is a BOOL indicating whether the receiver can zoom
    public var canZoom: Bool { get }

    // Controls zoom level of image outputs.
    public var videoZoomFactor: CGFloat { get }
}
These properties are available from lensCamera.sharedInstance.currentDevice.
Zoom
To enable pinch-to-zoom, create a UIPinchGestureRecognizer and add it to your
cameraPreviewView:
let zoom = UIPinchGestureRecognizer(target: self, action: #selector(handleZoom(_:)))
cameraPreviewView.addGestureRecognizer(zoom)
In your zoom handler, call LensCamera’s zoom(with:) method, and pass the
sender property:
@objc private func handleZoom(_ sender: UIPinchGestureRecognizer) {
    LensCamera.sharedInstance?.zoom(with: sender)
}
Implement the optional delegate method to be notified when the zoom factor changes so that you can update your user interface. This is always delivered on the main queue:
public protocol LensCameraDelegate: AnyObject {
    // Called when LensCamera preview view changes zoom level.
    func lensCameraDidChangeZoomLevel(_ zoom: CGFloat?, error: Error?)
}
Focus
To enable tap-to-focus, create a UITapGestureRecognizer and add it to your
cameraPreviewView:
let tap = UITapGestureRecognizer(target: self, action: #selector(handleTapToFocus(_:)))
cameraPreviewView.addGestureRecognizer(tap)
In your tap handler, call LensCamera’s focus(with:)method, and pass the
sender property:
@objc private func handleTapToFocus(_ sender: UITapGestureRecognizer) {
    LensCamera.sharedInstance?.focus(with: sender)
}
This tells LensCamera to set the device’s focus point of interest, and to
begin auto exposure for the selected point. You can use this method to add a
focus reticle to the camera view. See the example implementation at the end of
this document.
Implement the optional delegate method to be notified when LensCamera focuses
on the selected point, or when an error occurs during focus and exposure. This
is always delivered on the main queue:
public protocol LensCameraDelegate: AnyObject {
      // Called when the focus point of interest changes.
    func lensCameraDidFocusOnPoint(_ point: CGFloat?, error: Error?)
}
If an error is returned, it will be of type LensCameraError.setFocusFailed.
Flash
Flash availability depends on the current capture device’s capabilities.
lensFlashMode can only be set to the values contained in
supportedFlashModes.
LensFlashMode has three possible states:
public enum FlashMode: Int {
    // Indicates that the flash should always be off. Default.
    case off = 0
    // Indicates that the flash should always be on.
    case on = 1
    // Indicates that the flash should be used automatically depending on light conditions.
    case auto = 2
}
The current state of flash can be obtained or set with this property:
LensCamera.sharedInstance?.currentDevice?.flashModeTo cycle through the available flash modes, call:
LensCamera.sharedInstance?.toggleFlash()Implement the optional delegate method to be notified when Lens changes the flash mode, or when an error occurs. This is always delivered on the main queue:
public protocol LensCameraDelegate: AnyObject {
    func lensCameraDidSetFlashMode(_ mode: LensCaptureDevice.FlashMode?, error: Error?)
}
Switching Cameras
You can optionally add a control to your user interface to switch between front and back cameras. By default, the back camera is activated when the session is configured.
public enum Position: Int {
    case unspecified = 0
    case back = 1   // default
    case front = 2
}
The currently selected position can be obtained via this property:
LensCamera.sharedInstance?.currentDevice?.devicePositionTo toggle between front and back devices, call:
LensCamera.sharedInstance?.changeCamera()Implement the optional delegate method to be notified when Lens switches between back and front cameras, or when an error occurs. This is always delivered on the main queue:
public protocol LensCameraDelegate: AnyObject {
    func lensCameraDidChangeTo(_ device: LensCaptureDevice?, error: Error?)
}
Location Accuracy
Your customer’s location at the time they capture a photo or video is an important piece of provenance. The more accurately that location can be determined, the better. The device’s location can be determined in a number of ways: directly from a GPS, or approximated by cell phone tower or WiFi network triangulation, and each have varying degrees of accuracy. Moving around, or going from outdoors to indoors can also affect accuracy. This variance is encoded as a radius of uncertainty about the device, measured in meters. The threshold is the maximum accuracy required to enable the camera. After that threshold is passed, the user may begin taking photos. Lens will continue to get a more accurate reading even after the threshold is passed, often down to 3-4m of accuracy. The user experience would be negatively affected if we prevented capture until that level of accuracy was achieved because it can take 30 seconds or more.
The default location accuracy used by Lens is 1500 meters, or approximately 1 mile. To lower this call the following on LensCamera:
@discardableResult
public func setMaximumLocationAccuracy(_ newValue: Double) -> Bool
The range of valid values is from 3 to 1500 meters. If a value is set beyond these bounds, the function will return false, otherwise true is returned. Note that setting this value very low may increase the time it takes for Lens to get an accurate location reading, and enable the camera for capture.
Handling Errors
Errors, in general, will be surfaced to your app via the delegate method
func lensCameraFailedWithError(_ error: LensCameraError) {}where LensError is defined as:
public enum LensCameraError: Error {
    // Some other error occurred. Check the `localizedDescription` for more information.
    case internalError
    // An error occurred within the device enrollment process.
    case enrollmentError
    // An error occurred when requesting a trusted timestamp.
    case timestampError
    // An error occurred which caused the currently configured camera session to fail.
    case cameraSessionFaled
    // An error occurred which caused the image signing process to fail.
    case imageSigningFailed
    // Device is in airplane mode. Airplane mode must be disabled to allow capture.
    case airplaneMode
    // Permission to the camera was denied.
    case cameraPermissionDenied
    // Permission to the microphone was denied. Required to record videos with audio.
    case microphonePermissionDenied
    // Permission to the user's location was denied.
    case locationPermissionDenied
}
In the case of enrollmentError, check that your API key is being passed
properly, and that the App Attest service has been configured on your app’s web
server. Check attestation logs for any errors.
Example Implementation - UIKit & Storyboards
We recommend starting the enrollment process before presenting the camera, as
this can take a few seconds to complete. In your application delegate, make a
call to LensEnrollment, passing your API Key:
import UIKit
import LensSDK

@main
class AppDelegate: UIResponder, UIApplicationDelegate {

    var window: UIWindow?

    func application(_ application: UIApplication, didFinishLaunchingWithOptions launchOptions: [UIApplication.LaunchOptionsKey: Any]?) -> Bool {
        // Override point for customization after application launch.

        // Initiates the enrollment process with your API key. It may take a few
        // seconds, so it's best to do so early in your app's startup sequence.
        let _ = LensEnrollment(apiKey: YOUR_API_KEY)

        return true
    }

    func application(_ application: UIApplication, handleEventsForBackgroundURLSession identifier: String, completionHandler: @escaping () -> Void) {
        // LensCamera uses background URLSession tasks, and this completion
        // handler is required to be set.
        LensCamera.sharedInstance?.activityCompletionHandler = completionHandler
    }
}
import UIKit
import LensSDK
import Dispatch
class ViewController: UIViewController, LensCameraDelegate {
// `cameraPreviewView` is a subview of the view controller's view, and is passed to Lens
// during instantiation. It will host Lens' camera preview.
// The view should extend to the top and bottom safe area layout guides.
// Camera controls should be sibling views to `cameraPreviewView`.
@IBOutlet weak var cameraPreviewView: UIView!
// A button whose action will trigger photo capture.
@IBOutlet weak var captureButton: UIButton!
// A label which shows how long the current video has been recording.
@IBOutlet weak var durationLabel: UILabel!
// A custom UIView which acts as a visual aid to focus operations.
// FocusReticleView is a custom view, and is not part of the Lens SDK.
private let focusReticle = FocusReticleView()
private let reticleSize: CGFloat = 132
// DispatchSourceTimer is preferred over Timer because Timer requires a
// run loop and delivers its events with some latency.
private var timer: DispatchSourceTimer?
private let timerInterval = DispatchTimeInterval.seconds(1)
private let timerQueue = DispatchQueue(label: "com.yourcompany.videotimer")
private var durationInSeconds: Int = 0 {
didSet {
updateDurationLabel()
}
}
override func viewDidLoad() {
navigationController?.isNavigationBarHidden = true
guard let lens = LensCamera.sharedInstance else { return }
lens.configureSession(previewView: cameraPreviewView, delegate: self)
}
deinit {
timer?.cancel()
}
// MARK: - IBAction
@IBAction func captureButtonAction(button: UIButton) {
guard let lens = LensCamera.sharedInstance else {
print("Unable to find LensCamera instance.")
return
}
switch lens.cameraMode {
case .photo: self.takePhoto()
case .video: self.recordVideo()
}
}
@IBAction func toggleMode(button: UIButton) {
guard let lens = LensCamera.sharedInstance else {
print("Unable to find LensCamera instance.")
return
}
switch lens.cameraMode {
case .photo: lens.cameraMode = .video
case .video: lens.cameraMode = .photo
}
}
@IBAction func switchCamera(button: UIButton) {
guard let lens = LensCamera.sharedInstance else {
print("Unable to find LensCamera instance.")
return
}
lens.changeCamera()
}
@IBAction func toggleFlash(button: UIButton) {
guard let lens = LensCamera.sharedInstance else {
print("Unable to find LensCamera instance.")
return
}
lens.changeCamera()
}
// MARK: - UIGestureRecognizer
@objc func handleTapToFocus(_ sender: UITapGestureRecognizer) {
guard let lens = LensCamera.sharedInstance else {
print("Unable to find LensCamera instance.")
return
}
focusReticle.removeFromSuperview()
let focusPoint = sender.location(in: cameraPreviewView)
self.cameraPreviewView.addSubview(focusReticle)
focusReticle.frame = CGRect(x: focusPoint.x - reticleSize/2,
y: focusPoint.y - reticleSize/2,
width: reticleSize,
height: reticleSize)
focusReticle.animateReticle(at: focusPoint)
lens.focus(with: sender)
}
@objc func handleZoom(_ sender: UIPinchGestureRecognizer) {
guard let lens = LensCamera.sharedInstance else {
print("Unable to find LensCamera instance.")
return
}
lens.zoom(with: sender)
}
// MARK: - private methods
private func takePhoto() {
takePhotoAnimation()
LensCamera.sharedInstance?.beginCapture()
}
private func takePhotoAnimation() {
DispatchQueue.main.async { [weak self] in
guard let preview = self?.cameraPreviewView else { return }
preview.layer.opacity = 0
UIView.animate(withDuration: 0.30) {
preview.layer.opacity = 1
}
}
}
private func updateDurationLabel() {
let minutes = durationInSeconds / 60 % 60
let seconds = durationInSeconds % 60
let durationString = String(format: "%02d:%02d", minutes, seconds)
// Updating the UI needs to happen on the main thread
DispatchQueue.main.async {
self.durationLabel.text = durationString
}
}
private func startTimer() {
timer = DispatchSource.makeTimerSource(flags: [], queue: timerQueue)
timer?.setEventHandler(handler: { [weak self] in
self?.durationInSeconds += 1
})
timer?.schedule(deadline: .now() + .seconds(1), repeating: .seconds(1), leeway: .nanoseconds(0))
timer?.resume()
}
private func stopTimer() {
timer?.cancel()
durationInSeconds = 0
}
private func recordVideo() {
guard let lens = LensCamera.sharedInstance else { return }
is lens.isRecordingVideo {
lens.stopVideoCapture()
} else {
lens.startVideoCapture()
}
}
}
// MARK: - LensCameraDelegate
extension ViewController {
func lensCameraDidFailWithError(_ error: LensCameraError) {
// handle the error appropriately
}
}
// MARK: - LensCameraDelegate - Photo capture
extension ViewController {
func lensCameraDidGeneratePhotoThumbnail(_ imageName: String, image: UIImage) {
// add thumbnail to a gallery
}
func lensCameraDidGenerateTruepic(_ imageName: String, image: Data) {
// save photo to Camera Roll or upload to host's server.
// Converting the returned image data to a `UIImage` will result in a loss of
// C2PA assertion and claim metadata. `UIImage` does not support the features generated
// during image signing.
}
}
// MARK: - LensCameraDelegate - Video capture
extension ViewController {
func lensCameraDidStartRecordingVideo() {
self.startTimer()
// Other UI updates, dispatched to the main thread.
}
func lensCameraDidStopRecordingVideo() {
self.stopTimer()
// Other UI updates, dispatched to the main thread.
}
func lensCameraVideoRecordingFailed(error: Error?) {
// Present a warning to the user.
}
func lensCameraDidGenerateVideoThumbnail(fileName: String, image: UIImage, duration: TimeInterval?) {
// Add the thumbnail to a gallery.
}
func lensCameraDidGenerateTruepicVideo(_ url: URL) {
// Upload the signed video to a host server.
}
func lensCameraDidGenerateUnsignedVideo(_ url: URL) {
// Upload the unsigned video to a host server.
}
}Offline Capture
Lens offers out of the box support for capturing and signing photos and videos offline, which can be uploaded to your server or directly to the Lens API when the device regains connectivity. To learn more about the differences between online and offline capture, visit the Offline Capture Documentation.